How do I set up the BlueTrace Distributor App?
This article is a comprehensive overview for how to get started using the BlueTrace Distributor App.
Download the app
BlueTrace offers two apps in the AppStore, the one designed for Wholesalers, Distributors, and Processors is called "BlueTrace Distributor". Download it to get started.
Log in to the app
Use your username or email + password to login. If you do not recall your password, use the password reset flow.
Navigate to "Settings"
Tap "Settings" from the menu at the bottom of the screen. Tap each item to go into that setting and enter your data.
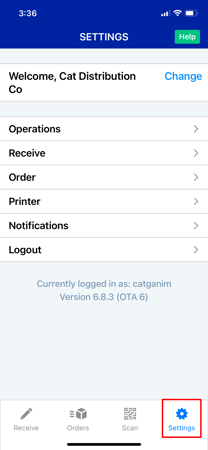
Operation Settings
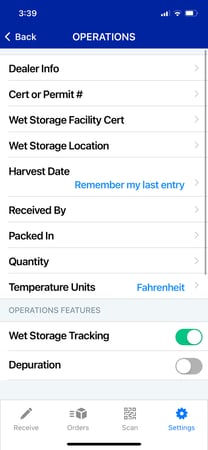
This is where you will configure your operational details. Here are the critical ones to fill in and what they mean:
- Dealer Info This is what will print on the top of your tag. (Name, address, website, phone...)
- Cert or Permit #: These are your state/federal/provincial/local certifications. You can enter more than one cert if you use different ones in specific circumstances on your tags. The format for certs is generally: Your state, a few digits, and then the cert designations. EX: RI-123-SS/WS - this means in RI, you are a certified shellstock shipper and you can perform wet storage.
- If you perform wet storage, you can toggle it on at the bottom of the screen, and then setup any certs or locations you may need printed on your tags or put in your logs
- For Harvest Date: in the Receive form this date can be pre-filled to use the last day entered inside the app, it can default to today's date, or it can be left blank so you need to enter it.
- Received By: enter any employee's names you'd want to appear in your HACCP log. This "received by" field will be set when you record items you received inside the app.
- Quantity: this is where you would set the quantities you handle. There's a whole article on how this works here.
- Temperature Units: set if you use F or C
Receive Settings
- Brands: What do you call your product. Examples: Deluxbury, French Kiss....
- This includes specifying the TYPE or SPECIES of the product as well as a brand name
- If you are using "Items" to define your product list, you can ignore this - it can be setup as a part of the item
- Harvest Location: Typically a two part field: Duxbury, MA CCB 31 - this is the location where the item was harvested, often critical for traceability.
- Size/Cull: The size of the product can be specified here, here are some shellfish examples: Petites, Markets, Littlenecks, Countnecks...
- If you are using "Items" to define your product list, you can ignore this - it can be setup as a part of the item
- Vendor Received From: Who do you buy product from?
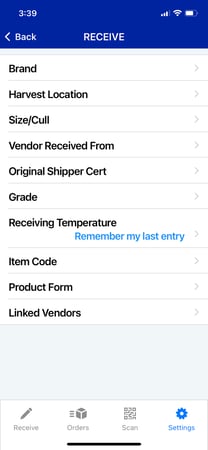
- Original Shippers: Often the same as vendor, but it can be different. You can set them here or when you receive.
- Grade: for fish, you may want to capture the grade of the product
- If you are using "Items" to define your product list, you can ignore this - it can be setup as a part of the item
- Receiving Temperature: You can specify a default receiving temp, and then change in when you receive as needed
- Item Code: Some companies use a code as a short hand for their product, or some companies require their customers to use THEIR item coding to make their lives easier.
- If you are using "Items" to define your product list, you can ignore this - it can be setup as a part of the item
- Product Form: This is like "headed and gutted" for fish or "Shucked" for shucked shellfish.
- If you are using "Items" to define your product list, you can ignore this - it can be setup as a part of the item
- Linked Vendors: when you scan a BlueTrace tag to receive product from a vendor also using BlueTrace, you become linked in the system. This helps you see what's coming to you from them in the Incoming tab of the app (which appears if you have a list of incoming items
Order Settings
- Customer: Who buys/receives your product? If you include an email address, you can
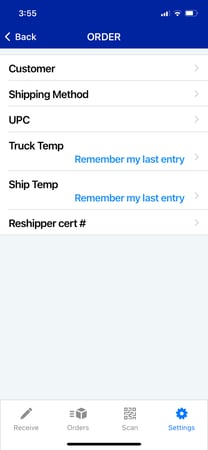 automatically email them notifications of incoming. If you include the address, we will print that on the labels to avoid confusion.
 - Shipping Methods: Truck routes (Araho to Ocean Express). Can also be something like: Local Pick up, Airfreight
- UPC: if you need to print a UPC on some of your tags, you can set it here (if you don't see this, ask your sales rep to have it enabled)
- If you are using "Items" to define your product list, you can ignore this - it can be setup as a part of the item
- Truck Temp & Shipping Temp: pre-fill these temp settings when building an order by setting up how you want it to behave here in settings
- Reshipper Cert: if your customer is reshipping your product, you can setup their cert here in settings then set it on your order - you can also request to have this printed on your tags if needed
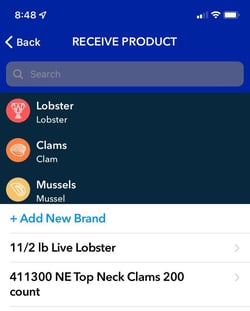
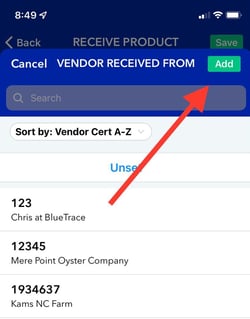
In addition to adding items in settings, you can also add all fields inline
- If you are receiving something new, just "+Add New Brand"
- If it is a new vendor (or new size, harvest location...) just click "Add" in the upper right.
Next, get started with key workflows:
1. Try receiving a "lot" of seafood, more details
2. Try packing an order using that received lot of seafood, more details