Download the app
BlueTrace offers two apps in the AppStore, the one designed for Harvesters and Dealers to print shellfish tags and seafood labels is called "BlueTrace Tag Printing". Download it to get started.
Log in to the app
Use your username or email + password to login. If you do not recall your password, use the password reset flow.
Navigate to "Settings"
Tap "Settings" from the menu at the bottom of the screen. Tap each item to go into that setting and enter your data.

Set up your Harvester/Dealer profiles
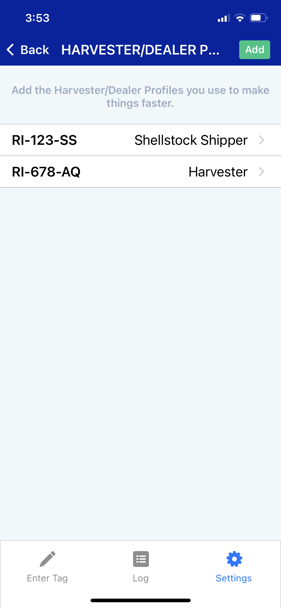
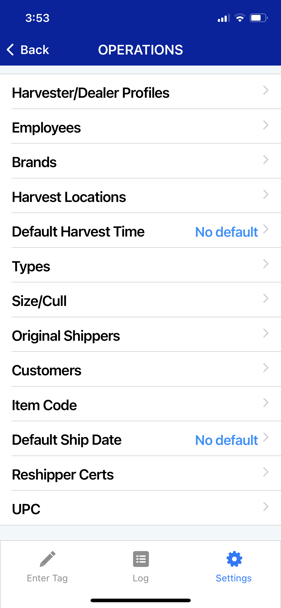
Tap Operations > Harvester > Dealer Profiles > Tap "Add" to add new
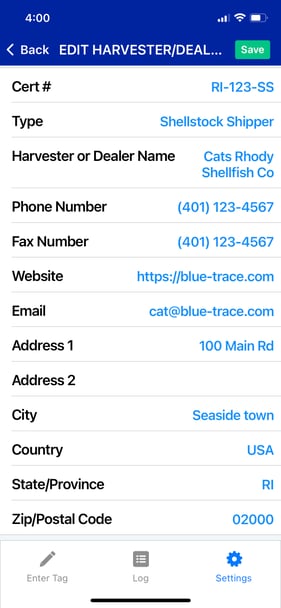
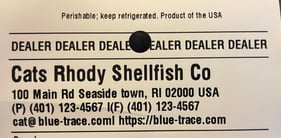
Depending on your licensing, you will set up a Harvester Profile and/or a Dealer Profile. Your profile is identified by the Cert # and Cert Type. Whatever information you add into the Profile will be what's printed at the top of your tag. You can have more than one profile.
|
Operations Menu Options
|
List of Profiles
|
When you're adding a new profile, the information you enter will appear printed at the top of the tag. So if there are important contact details you'd like on your tags, enter that information.
Tap "Save" at the top when you're done. You can edit your profiles at any time, or delete any of them.
|
Add a New Profile
|
Profile info printed at the top of the tag
|
Set options for each field
You may sell several types of items, harvested from various locations. You can pre-define these as options so you can simply pick from a list when it's time to create a tag or label. Navigate to Settings > Operations to set these options.
Note: These can also be left blank and they can also be added on-the-fly as you fill our the tag form.
- Brands: enter any brand names you use to market your animals. This is helpful, but not required by regulations.
- Harvest locations are required by regulations. In some states, this needs to be the specific lease or parcel number, in other states, you can be less specific. In general, put in the most specific description of the harvest location you can and include the state.
- Default harvest time: if you'd like this can be auto-set to the current time, it can recall your last entry, or it can have no default pre-populated into the tag form.
- Types: this refers to animals types: Oysters, Clams, Mussels, Goeducks.... Regulators generally want to see Farm Raised or Wild and Country of origin.
- Sizes/culls: animal size or cull - enter the ones you typically use, ex: markets, 3", etc. Size/Cull designation is often optional as well.
- Original shipper certs: if you're operating as a dealer, you need to print wherever the inventory came from originally on your tag. You can add in data for the harvesters you typically interact with and their cert #s.
- Customers: The party who is buying your product. If used it will print on the tag- this may be helpful for shipping companies who handle your product. If you include an email address, you will have the option of sending an email about an incoming shipment.
- Default Ship Date: if you'd like this can be auto-set to today's date, it can recall your last entry, or it can have no default pre-populated into the tag form.
- There are other configuration options, like Item Codes, Reshipper Certs, and UPCs - reach out to your rep to learn more about those options.
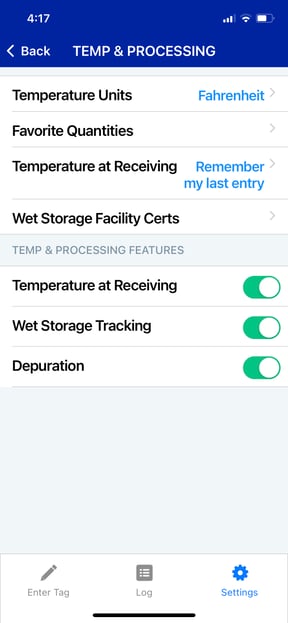
Set temp & processing details
You can customize the following:
- Temperature Units: Which unit of measurement you'd like to use for temperature entries
- Favorite quantities: learn more about quantity recording
- If you enable the option to capture a "Temperature at Receiving", then you can specify if you want this field to be remembered for repeat use, or if you'd like no default set
- If you enable the option to perform "Wet Storage tracking" you can also input any Wet Storage Facility Certs you have.
- If you perform Depuration, you can enable this, and you will be able to print Depuration tags.
Printer Settings
Navigate to Settings > Printer
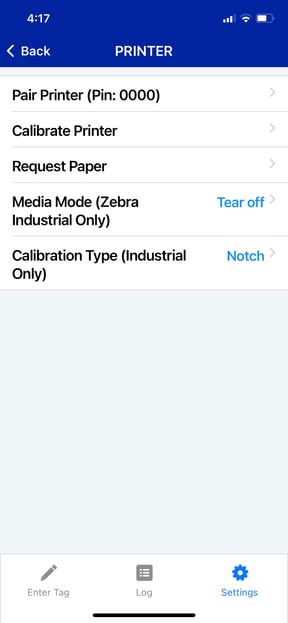
- Pair Printer: When you find your printer using your iOS device BlueTooth settings, it may ask you for a pin, we're showing you the pint to enter here "0000." After you've already paired a printer, you can tap this to connect to your known printers.
- Calibrate Printer: Push this button after you load a new roll of paper. After calibration, tags will print neatly between the perforations.
- If you have an industrial printer, you may see some additional options. See our articles for printer setup for more info: https://help.blue-trace.com/knowledge/printer-setup
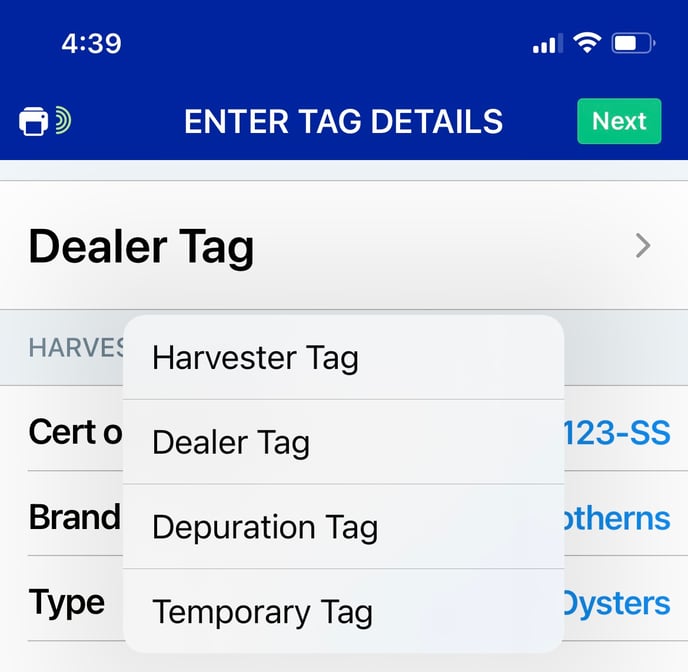
Print a tag > Tag switcher
After you have your settings sorted out, this is the first thing in the tag form to familiarize yourself with: the tag switcher.
Tap "Enter Tag" from the menu at the bottom of the screen to view the tag form. In the example below, a "Dealer Tag" is selected.
Whatever type of tag form you have currently selected will be displayed at the top of the screen and tapping it will load options for the other tag forms available.
- Harvest Tag Form: Doesn't include some fields required on a Dealer Tag
- Dealer Tag Form: Includes information for Receiving (if enabled) and Original Shipper and Wet Storage fields
- Depuration Tag Form: For folks who perform depuration, the depuration tag form includes fields for Processing Date and Depuration Cycle #
- Temporary Tag Form: Satisfies the requirement to have things tagged as you're moving them around, but doesn't create a log entry.
The type of tag you're creating influences the fields displayed, and the name of the type of tag which is printed on the top of the tag.
Print a tag
Once you've selected the correct Tag form (usually Dealer or Harvester), select Key Data for your tag:
- Cert or Permit: this is YOUR cert or permit
- Fill in some standard Shellfish tag requirements like: Brand, Type, Harvest Date, Harvest Location, Ship Date
- Try printing a tag
Requesting more paper
Navigate to Settings > Printer >Request More Paper
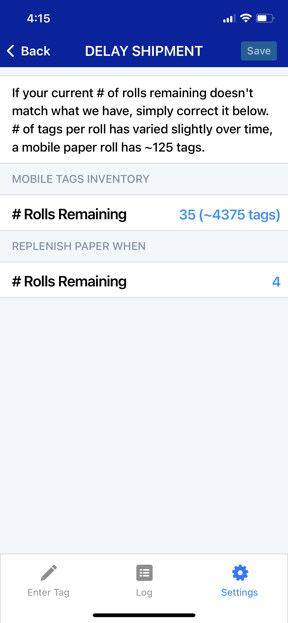
- Paper Inventory: The screen on the left below shows what we think you have left in stock, if this isn't correct (for example, your box of tag paper fell overboard!) then edit the number of rolls you have left
- Delay shipment: You can also delay your shipment - we send tags BEFORE you run out to make sure you never run into an emergency situation. You can however, wait until you only have 1 roll left to get the shipment, simply edit the # for "Replenish when: # of Rolls Remaining"
- Request more paper for ASAP shipment: at any time, you can order more paper, simply tap that option, fill in how many rolls you want, and make sure your shipping address is correct.
|
Current paper inventory
|
Delay your shipment
|