Three ways to Receive lots covered in this article:
- Receive Expected Lots tied to a Purchase (bulk receive)
- Receive one lot at a time on web
- Receive one lot at a time on iOS
Expected Lots for Purchases
Expected Lots help you plan and receive incoming product more reliably. For every line item on a purchase, BlueTrace can now create a “placeholder” lot that you (or your dock team) can fill in as the product is received.
This keeps all the work tied to a single purchase, reduces double entry, and makes it easier to enforce required compliance fields (like harvest date, harvest area, and receiving temperature).
What are Expected Lots?
When Expected Lots are turned on for your account:
-
Each line item on a purchase automatically gets one Expected Lot.
-
These lots live on the Received Lots tab of the purchase.
-
You can:
-
Pre-fill key information before the truck arrives (on the web), or
-
Fill it in as you receive product on the iOS app.
-
Once you actually receive the product, Expected Lots become Received Lots and appear in inventory like normal.
If you don’t use them, they behave like temporary placeholders and disappear when you close the purchase.
When are Expected Lots created?
-
Only new purchases created after Expected Lots are turned on will have them.
-
Any purchases you created before the setting was enabled will not show Expected Lots.
-
Each purchase line = one Expected Lot by default (you can split into multiple lots later during receiving).
If you’d like Expected Lots turned on for your organization, contact BlueTrace Support.
Where you’ll see Expected Lots
On the Web (Office / Purchasing)
-
Create and publish a purchase as usual.
-
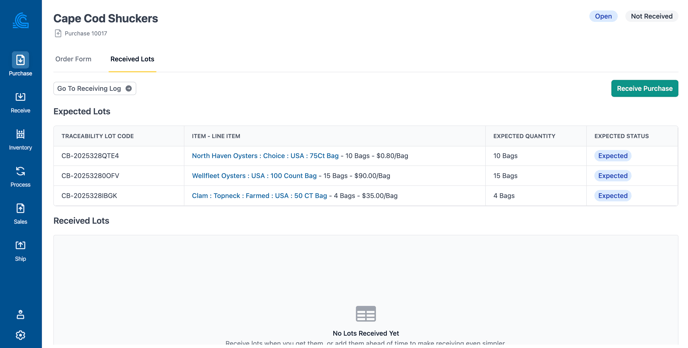
Open the purchase and go to the Received Lots tab.
-
You’ll see one Expected Lot per line item
-
From here you can:
-
Pre-fill data (harvest info, receiving info, etc.)
-
Or leave them blank and let the team fill them in on the app.
-

This is especially useful if you already know harvest details from paperwork or a pre-ship report and want to enter them ahead of time.
On the iOS App (Truck / Loading Dock)
-
Open the app and go to Orders (bottom nav).
-
Tap the purchase you’re receiving (e.g. Purchase – Cape Cod Shellfish).
-
Tap Receive.
-
You’ll see the same Expected Lots for that purchase, ready to be filled in and received.
The big change: instead of jumping around by vendor or by lot, your team can work purchase-by-purchase, line-by-line.
Controlling Required Fields with Item Groups
Expected Lots work hand-in-hand with Item Groups so you can:
-
Control which fields show up when receiving.
-
Enforce required fields by item type (e.g. shellfish vs finfish).
For example:
Shellfish Item Group might require:
-
Harvest Location
-
Harvest Date
-
Receiving Temperature
(Receive Date can auto-fill if left blank.)
Finfish / Other Seafood Item Group might:
- Require a vendor
- Hide shellfish-only fields like harvest location or original shipper
This reduces cognitive load on the team by only showing fields they actually need for that type of product.
You can update Item Groups at any time and then test by receiving a purchase to see how the form changes.
How to Receive a lot and associate it to a Purchase on the Web App via the Receive Log
- Navigate to the Receive Log
- Tap "Add Lot"
- Select the Item you'd like to receive
- Enter the quantity
- Fill in the form:
- Enter the vendor you're receiving inventory from
- Enter the purchase # for the vendor you're receiving from
- Enter any key data points you'd like in your log for this receipt, ex: temperatures, country of origin, harvest location, etc.
- Click Receive
How to Receive a lot and associate it to a Purchase on the iOS via the Receive Log:
- Navigate to the Receive Log
- Tap New
- Enter the item you're receiving
- Enter the quantity you're receiving
- Enter the vendor you're receiving inventory from
- Enter the purchase # for the vendor you're receiving from
- Enter any key data points you'd like in your log for this receipt, ex: temperatures, country of origin, harvest location, etc.