Before you start, please read
High level overview of the steps you'll walk through below.
-
Log in to QuickBooks as the Admin user (required temporarily).
-
Install the Intuit Web Connector onto your PC when prompted & provide required permissions and info — this tool allows QuickBooks Desktop to communicate with BlueTrace. This should be open and running during business hours when Quickbooks invoices and POs need to be created.
-
Choose one QuickBooks user to be associated with all Web Connector activity. This user needs permission to do the things the web connector will do: create/update invoices, create/update POs, create new items, vendors, or customers.
That user must stay logged into QuickBooks on the computer where the Web Connector is installed. You can’t switch users while it’s running.
If multiple people share a computer, designate one login to always run QuickBooks for the Web Connector.
Installing the Web Connector
In BlueTrace Web Application, navigate to Settings > Integrations > Tap Connect and then follow the steps:
Step 1:
Click Connect > Connection Window Opens > Tap Continue
Important: The connection window should remain open until the instructions say you can close it (last step).

Step 2:
Select Quickbooks Desktop as your platform 
Step 3:
Make sure your instance of Quickbooks Desktop is open and running on your PC for the next screen - please follow step 4 closely to fill in the data.

Step 4:
This varies per version of QB Desktop, but you can either enter your Account Name exactly as it appears in Quickbooks or you may be asked to enter your Quickbooks Customer Account # into the field in the dialog
To find your Account ID or Account Name, within Quickbooks Desktop please click on "My Company" on the left sidebar. Then click on the "Manage Your Account" button on the right. Your customer account number should appear under the "Account Details" heading.
Here's an example of what this looks like when you are viewing the correct screen:
Enter the Customer Account Number (shown above)
Enter the company File Path - here's how to find it:
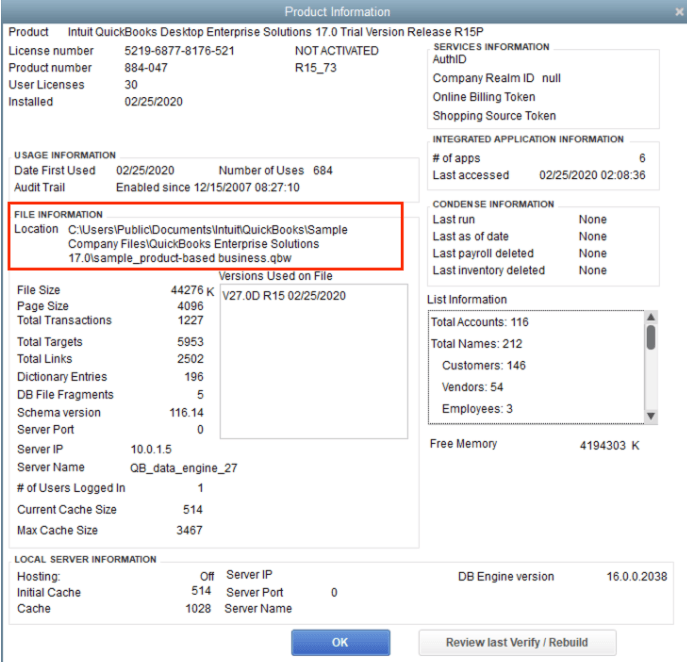
1. Open QuickBooks Desktop 2. Open the Company File you wish to connect to QBD 3. Press F2 (or CTRL 1 on some systems) on your keyboard to open up the following window in QuickBooks Desktop titled 'Product Information'
Step 5:
"Click here to download the .qwc file" - Download the web connector file

Step 6:
Copy your unique password
Step 7:
Install the web Connector
- From downloads open the web connector
- Authorize it by clicking OK
- Click on "Yes, always allow access; even when my Quickbooks isn't running"
- Application Permission Confirmation - Click "Yes"
- Click "Continue"
- Click "Confirm"
- The web connector should open, if it does not, within quickbooks, navigate to FILE > App Management > Update Web Services
- Here's what the open web connector looks like:


Step 8:
Check off the box next to the Application "BlueTrace" in the list. Then enter the password that you copied in the previous step.

Step 9:
Adjust the "Every-Min" value to every 5 mins

Step 10:
Click "Update Selected" & wait for the Application Progress & Total Progress to reach 100%


Step 11:
Return to the open dialog on the BlueTrace site - click Verify Connection

You should see a success message - then you can progress with the rest of the Quickbooks integration setup
Note: during the process (not show) you may be asked to specify a user to run the web connector. This user also needs permission to create invoices and purchases if you'd like to automate those, respectively.

Troubleshooting the Web Connector
If for some reason the web connector becomes unresponsive, here are the steps to "start over" - you need to follow the un-install steps exactly, then you can follow the re-install steps.
Step 1: Remove the App from Web Connector
-
Open QuickBooks Desktop and sign in to the company file as the admin.
-
Navigate to File > App Management > Update Web Apps.
This will launch the web connector - in the web connector screen:-
Uncheck auto update
-
Uncheck the App
-
Click Remove
-
Confirm
-
-
Select the app you want to remove and click Remove.
-
Confirm the removal on the confirmation screen.
Step 2: Remove the App from Integrated Applications in Quickbooks Desktop
-
In QBD > Go to Edit > Preferences > Integrated Applications.
-
Select Company Preferences.
-
Locate the app you want to remove, click Remove, and then select OK.
Step 3: Uninstall the web connector from your computer
Uninstall via Control Panel
-
In the Control Panel, select Uninstall a Program under the Programs section.
-
Locate QuickBooks Web Connector in the list of installed programs.
-
Select it and click Uninstall at the top of the window.
-
Follow the prompts to complete the uninstallation process
Make sure no web connector files are still installed. That shouldn't matter, but we don't want any extra variables.
If it doesn't appear in the control panel, find the file, move it to the trash, then empty the trash. The file ends in .qwc
Step 4: Scroll to the top of the page to go through the installation process again
If there's any trouble, please reach out.