Pricing Permissions
- Buying Prices: To view, create and edit buying prices, a user needs need *any* Purchase Permission besides "No Permission" AND "Create & Edit" Pricing Permission
- List, Tier, and Customer Prices: For a user to set/control all selling prices, they need "Create & Edit" Pricing Permission
- To view but not edit pricing, a user would have "View Only" set for the "Pricing Permissions"
- If you do not want a user to view prices, set it to "No Permissions"
Types of Pricing:
- Buying Price: the standard price you would like to buy the item for from vendors, you can change this as often as you like. This price can be auto-filled into the purchase form (depending on your settings)
- List Price: the standard price you would like to sell the item for to customers. This price can be auto-filled into the sales order form (depending on your settings)
- Price Tiers: Prices for specific groups of customers, ex: Restaurants, Retailers, or Wholesalers - any subset of customers who should get the same price
- Special Item-Customer Prices: Prices set per item/customer combination which ensures a specialized selling price is set for the customer when sales orders are made. Read more.
- Special Item-Vendor Prices: Prices set per item/vendor which ensures a specialized buying price is set for the vendor when purchases are made. Read more.
Here's an video demonstration for setting up each of these prices:
How To Create Price Tiers
In the web app, navigate to Settings > Sales Orders > Price Tiers
You will notice the list price is already setup there, this is not removable. Click "Add Pricing Tier."
- Give your tier a name
- Set whether you want the tier price to be created automatically based on a % above/below the list price OR if you'd like to "Set price per item" - which means entering a price manually vs. using a % calculation
- Then enter the percentage above or below if needed (you need to enter a "-" to generate a % below list price)
- Save your tier
- Then click edit on your tier and click "add" next to customers you'd like to assign to the tier
- You can view any tier assignments on the customer page as well on the pricing tab
- Navigate to the Inventory/Items page
- If any tier is set up to "Set Price Per Item" this is where you would enter tier pricing
Sales Order and Purchase Pricing
The price that's automatically loaded into your sales order or purchase is based on Sales Order and Purchase Settings.
For Sales Orders:
- Navigate to Settings in the Web Application
- Click Sales Orders
- Click Sales Order Form
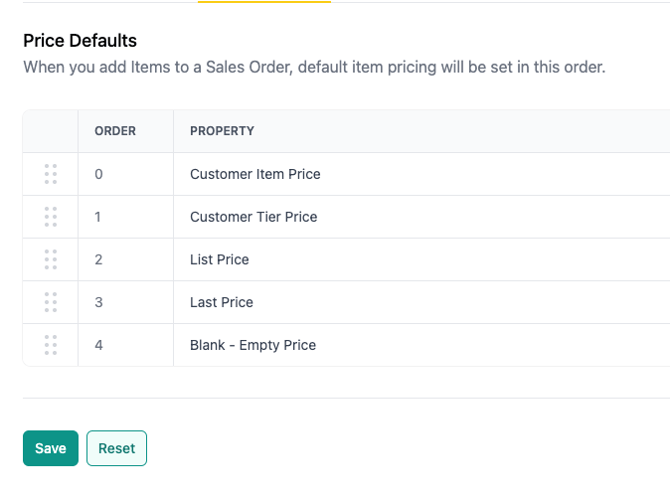
- Click Price Defaults
On this screen, you can rank you preference for which prices auto-populate when creating a sales order. Generally here's what we suggest:
For Purchases:
- Navigate to Settings in the Web Application
- Click Purchases
- Click Purchase Form
- Click Price Defaults
On this screen, you can rank you preference for which prices auto-populate when creating a Purchase. Generally here's what we suggest:
